A hacker is a highly skilled computer operator who uses bugs and exploits to break into computer systems and networks. An ethical hacker, on the other hand, identifies vulnerabilities in computer systems and networks, and plugs these holes. Here’s a round-up of the ten best operating systems for ethical hackers and penetration testers.
Hacking has been part of computing for over five decades and is a very broad area, covering a range of tasks. The term hacker originated in 1960 at MIT. Hacking is regarded as a process of locating all possible back doors that exist in a computer system or network and, finally, intruding into it. In simple terms, it is regarded as an unauthorised activity to gain access to a computer system or network, to harm it or prevent its normal functions and to steal sensitive information available on computing systems.
On the other hand, hacking can also be a legal activity when it is used to discover back doors and weaknesses in computer systems in order to patch them. This is called ethical hacking.
In today’s cyber world, lots of varied attacks occur every hour and are achieved by professional hackers, virus writers and crackers. The most basic tool required by every hacker is a hacking operating system. Usually, the operating systems specialising in hacking are based on the Linux kernel. These operating systems are regarded as advanced working systems, which include lots of ethical hacking and penetration testing tools.
In this article, the ten best operating systems used by ethical hackers and penetration testers are featured. All of them are free, open source, are based on the Linux kernel and are bundled with many hacking tools.
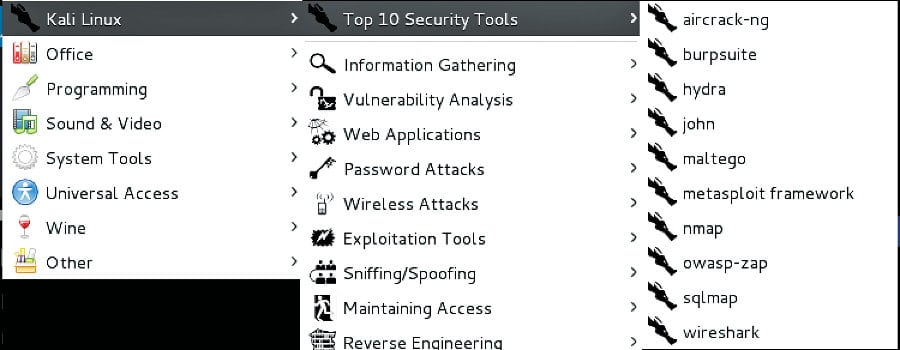
1. Kali Linux Kali Linux is based on the Debian-Linux distribution, and is especially designed for digital forensics and penetration testing. It is maintained and updated on a regular basis by Offensive Security Ltd, under the leadership of Mati Aharoni, Devon Kearns and Raphael Hertzog who are core developers. Kali comes pre-installed with more than 300 penetration testing programs and can be installed as a primary operating system on the hard disk, live CD/USB and can even run as a virtual machine using some virtualisation software.
Kali Linux supports both 32-bit and 64-bit images for use with x86 machines, and even supports various development boards like Raspberry Pi, BeagleBone, Odroid, CuBox, etc.
Figure 1: Kali Linux
Tool categories
Information gathering: These tools are used to gather information regarding DNS, IDS/IPS, network scanning, operating system, routing, SSL, SMB, VPN, VOPI, SNMP, email and VPN.
Vulnerability assessment: These tools access the CISCO network and discover vulnerabilities in several database servers.
Web applications: These tools are related to Web applications like content management systems, database exploitation, application proxies, Web vulnerability scanners, etc.
Password attacks: These tools perform password attacks via brute force, dictionary attacks, etc.
Exploitation tools: These exploit vulnerabilities in target systems for networks, the Web and databases, and to perform social engineering attacks.
Sniffing and spoofing: These tools sniff the network and Web traffic.
Maintaining access: These tools maintain access to the target machine, to assess operating system back doors and for tunnelling.
Reporting tools: These document the penetration testing process.
System services: These tools contain various pen-testing services like Apache, MySQL, SSH and Metasploit services.
Kali Linux is bundled with several tools that perform wireless attacks, reverse engineering, stress testing, hardware hacking and forensics.
Key features:
Bundled with more than 600 penetration testing tools as compared to Backtrack OS.
Completely free and open source and committed to GitHub, with the source code of each package being available.
Kali Linux is FHS (Filesystem Hierarchy Standard) compliant to locate binaries, and support files and libraries.
Kali Linux offers a custom kernel for customised coding and patching up the latest updates.
Every package in it is GPG signed and, hence, committed to high quality standards by developers.
ARMEL and ARMHF support allows Kali Linux to be installed on various other devices like Pi, Odroid, Chromebook, etc.
Latest version: Kali Linux 2016.2 (32-bit/64-bit)
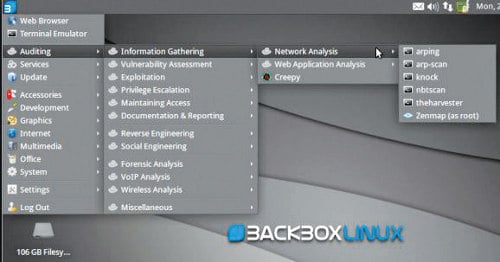
2. BackBox BackBox is an Ubuntu-based Linux distribution aimed at assisting ethical hackers and penetration testers in security assessments. BackBox OS is designed with the objective of being faster, easily operable and having a minimal desktop environment. The key advantage of BackBox is that its own software repositories are updated at regular intervals to keep the distribution stable and popular for real-world operations. The BackBox distribution consists of more than 70 tools for tasks ranging from Web analysis and network analysis to stress testing, sniffing, vulnerability assessment, forensics and exploitation.
Figure 2: BackBox Linux
Key features:
BackBox Linux is one of the first platforms supporting the cloud for penetration testing.
It is fully automated and non-intrusive, with no agents or network configuration changes required to achieve regular automated configuration backups.
Saves time and eliminates the requirement of tracking individual network devices.
With support of the XFCE desktop, BackBox is regarded as fast in operations and suitable even for old configuration systems.
Completely hacker friendly due to the support it receives for creating its own Launchpad PPA and sending the package to developers who, in turn, contribute instantly to BackBox Linux.
Latest version: 4.7
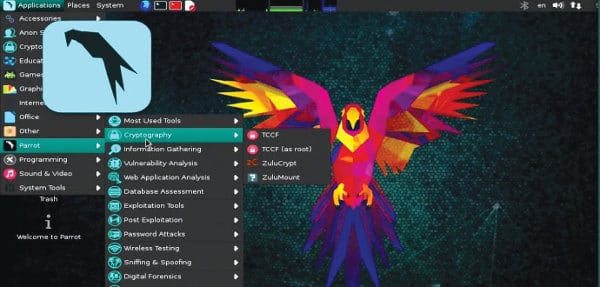
3. Parrot Security Operating System Parrot Security OS is based on Debian GNU/Linux combined with the Frozenbox OS and Kali Linux to provide ethical hackers the best-in-class experience of penetration and security testing in real-world environments. It is also designed to provide vulnerability assessment and mitigation, computer forensics and anonymous Web browsing, by the Frozenbox team. Parrot Security OS makes use of Kali repositories for all sorts of package updates and to integrate new tools. It makes use of the MATE desktop environment using the LightDM display manager to provide an easy-to-use GUI and lightweight environment for computer system analysts to perform all sorts of forensics, vulnerability assessment and cryptography. This OS is known for being highly customisable and for its strong community support.
Figure 3: Parrot Security operating system
Key features:
Equipped with the highly customisable kernel version 4.5, it is currently under rolling release upgrade line and based on Debian 9.
Has custom anti-forensic tools, interfaces for GPG, Cryptsetup, and support for LUKS, Truecrypt and VeraCrypt.
It supports FALCON 1.0 programming language, multiple compilers, debuggers and the Qt5 and .NET/mono frameworks.
Supports Anonsurf including anonymisation of the entire OS, TOR, I2P anonymous networks and beyond.
A special edition of Parrot Cloud, designed for servers, comprises lightweight Parrot OS distributions without graphics, wireless and forensics tools, and acts as a VPS or dedicated server with only useful security tools.
Latest version: 3.3
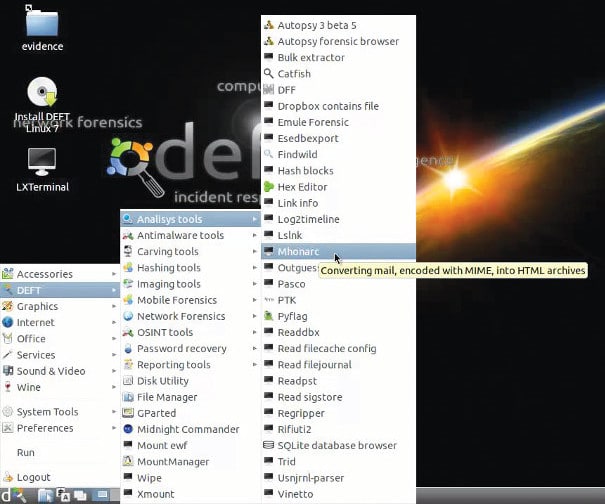
4. DEFT Linux DEFT (Digital Evidence and Forensics Toolkit) is based on GNU Linux and DART (Digital Advanced Response Toolkit), a forensics system comprising some of the best tools for forensics and incident response. DEFT Linux is especially designed for carrying out forensics tasks and runs live on systems without tampering with the hard disk or any other storage media. It consists of more than 100 highly-rated forensics and hacking tools. It is currently developed and maintained by Stefano Fratepietro along with other developers, and is available free of charge. It is used actively by ethical hackers, pen testers, government officers, IT auditors and even the military for carrying out various forensics based systems analysis.
Figure 4: DEFT Linux
Key features:
It is based on the Lubuntu distribution comprising open source digital forensics and penetration testing tools.
Full support for Bitlocker encrypted disks, Android and iOS 7.1 logical acquisitions.
Consists of Digital Forensics Framework 1.3.
Latest version: 8.2
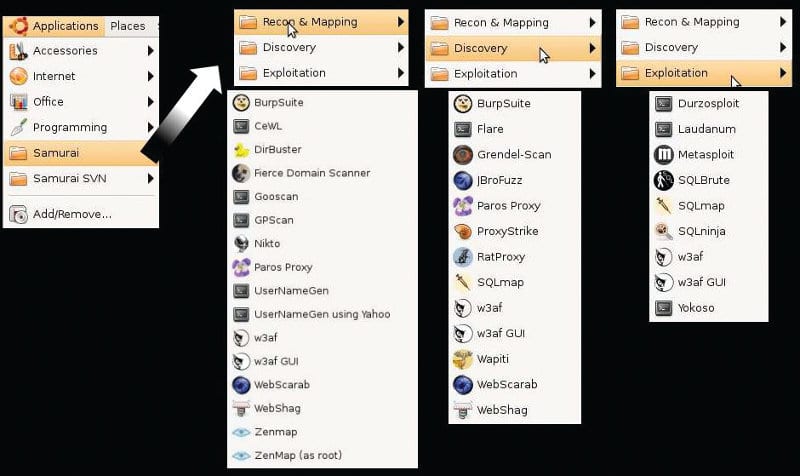
5.Samurai Web Testing Framework Samurai Web Testing Framework primarily focuses on testing the security of Web applications and comprises lots of Web assessment and exploitation tools. The credit for developing the Samurai Web Testing Framework goes to Kevin Johnson, Justin Searle and Frank DiMaggio. The Samurai Framework provides ethical hackers and pen testers with a live Linux environment that is preconfigured to run as a virtual machine to perform Web penetration testing. The Samurai Web Testing Framework includes popular testing tools like Fierce Domain Scanner and Maltego for Reconnaissance, WebScarab and Ratproxy for mapping, w3af and Burp for discovery, and BeEF and AJAXShell for exploitation. The framework is based on Ubuntu 9.04, is fully open source and receives regular updates with regard to products.
Figure 5: Samurai Web Testing Framework
Key features:
Contains many tools for reconnaissance, mapping, discovery and exploitation, especially focusing on Web penetration testing.
Equipped with SVN to provide updated security tools, and syncs with active development tools.
Latest version: 3.3.2
6. Network Security Toolkit The Network Security Toolkit (NST), based on Fedora, is a live bootable DVD/USB Flash drive consisting of the top 125 open source security tools provided by insecure.org to perform network security, penetration testing, network diagnostics and monitoring of day-to-day tasks. The main objective behind the development of NST is to provide network/systems administrators a combined set of open source security tools to carry out operations like network traffic analysis, intrusion detection, network scanning and security patching. NST has been developed by Ronald W. Henderson and Paul Blankenbaker. It provides a Web interface known as NST WUI and all the tools can be accessed via the Web page. NST is equipped with intelligent package management capabilities based on Fedora and maintains its own repositories of additional packages.
Figure 6: Network Security Toolkit
Key features:
Provides visualisation of ntopng, ntop, Wireshark, traceroute, NetFlow and Kismet data.
JavaScript console with built-in object library helps in the development of dynamic Web pages.
Other features include network intrusion detection, Web-based Snort IDS integration, active connections monitor, VNC/RDP desktop session management, host/IPv4 address geolocation and network segment ARP scanner.
Latest version: 24-7977 Release.
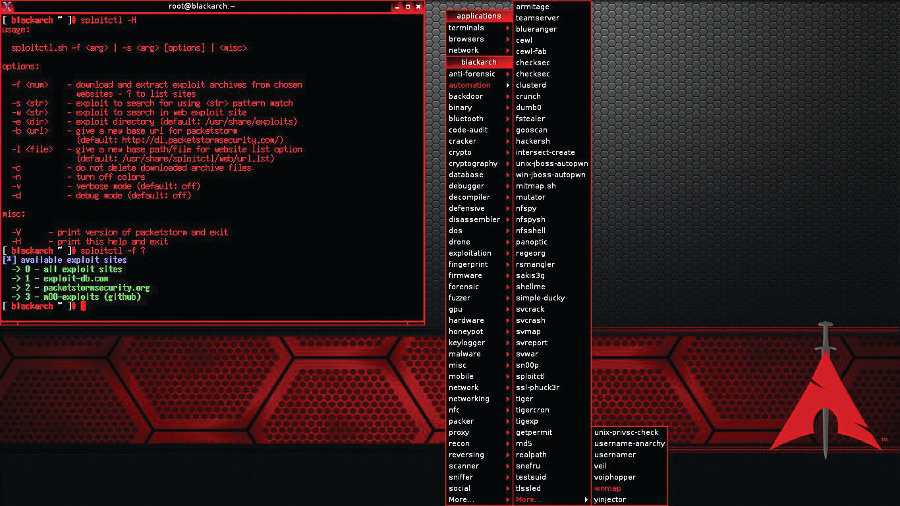
7. BlackArch Linux BlackArch is an Arch Linux-based security and penetration testing distribution, which consists of more than 1600 tools and is regarded as the first choice distribution among security researchers to do Web and applications based security testing. It is a strong alternative to Kali Linux and Backbox in terms of the variety of its tools and ease of use. BlackArch is basically a lightweight extension to Arch Linux for security researchers, as the tool set within the former is distributed as the Arch Linux unofficial user repository and can even be installed on top of existing Arch Linux. Arch Linux can be installed on 32-bit and 64-bit machines including ARM based development boards like Raspberry Pi, BeagleBone, etc.
Figure 7: BlackArch Linux
Key features:
GUI interface is powered by Fluxbox and includes i3, WMii, Spectrwm, Awesome, dwm and Openbox window managers.
Has modular package groups.
Installation can be performed from source.
Latest version: 2016.12.29
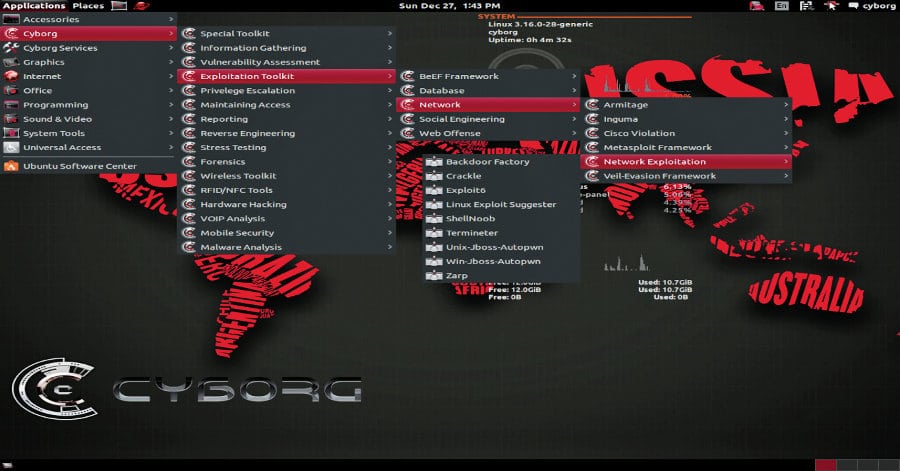
8. Cyborg Hawk Linux Cyborg Hawk Linux is regarded as the most advanced, powerful and well-managed Ubuntu based penetration testing Linux distribution created by Ztrela Knowledge Solutions Pvt Ltd. The distribution consists of more than 700 tools dedicated to penetration testing, and more than 300 tools for mobile security and malware analysis. Cyborg Hawk Linux is completely open source and free to use, and the latest version comes with its own repository. The distribution is highly reliable and stable in the eyes of ethical hackers and pen testers for real-world stress testing of networks, malware analysis and finding out back doors.
Figure 8: Cyborg Hawk Linux
Key features:
Full support for wireless devices.
Can be installed as a virtual machine.
Managed and well-sorted menus in the distribution.
Bundles tools for exploitation, stress testing, reverse engineering, forensics, mobile security and wireless security.
Secured and well patched kernel.
Has full capability to run as Live OS.
Latest version: Version 1.1
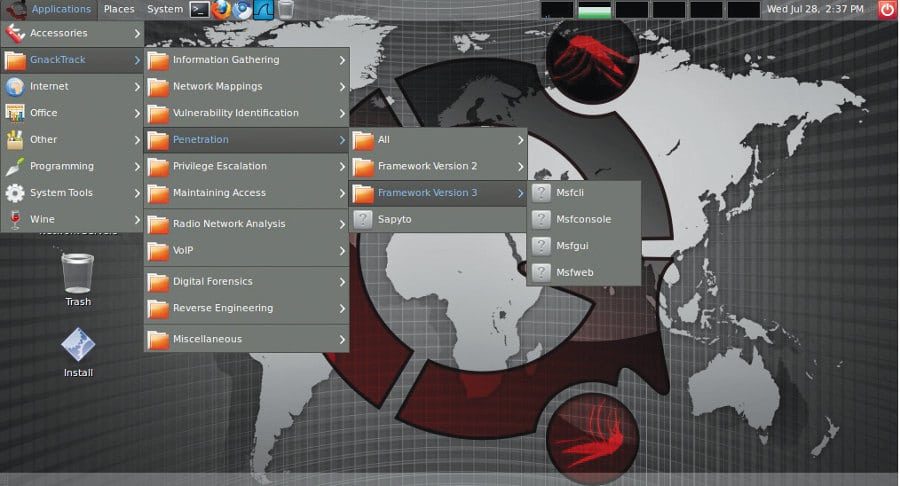
9. GnackTrack GnackTrack is an Ubuntu based penetration testing Linux distribution which includes lots of utilities for penetration testing. It has a GUI based GNOME desktop for easy interfacing. GnackTrack is an open source and free project, and contains various significant penetration testing tools like Metaspoilt, Armitage, wa3f and many more.
Figure 9: GnackTrack
Key features:
Supports both 32-bit and 64-bit hardware platforms for installation and running live OSs.
Standard boot menu for booting up live DVD OS.
Inspired by Backtrack and the most useful choice for starters to learn and research penetration testing.
Latest version: Version R6
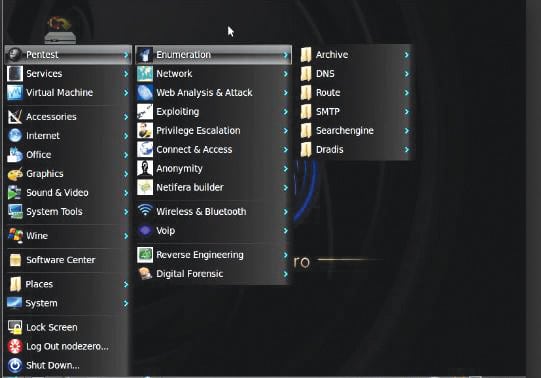
10. NodeZero NodeZero is an open source Ubuntu based penetration testing Linux distro, which makes use of Ubuntu repositories for updates. It consists of more than 300 penetration testing tools as well as a set of basic services that are required for carrying out all sorts of operations. The Linux distribution is available for download as a dual-arch live DVD ISO image, and can run on both 32-bit and 64-bit computing architectures.
Figure 10: NodeZero
The live OS supports various other features like system memory diagnostic tests, hard disk booting, install direct, safe mode booting, text mode or debug mode.
Sunday, March 3, 2019
Hello Friends My Blog Is Technical News And Facts And Other Kinds Of Information
YouTube, the Google-owned video network, boasts over a billion users— almost one-third of all people on the Internet — and every day people watch hundreds of millions of hours on YouTube and generate billions of views. On mobile alone, YouTube reaches more 18-34 and 18-49 year-olds than any cable network in the U.S.
What’s amazing, though, is that only 9% of small businesses in the U.S. are actively using YouTube, and my hunch is that figure would be pretty accurate worldwide, too.
Or at least that’s the perception many of us have.
In reality, though, video is becoming much easier and cheaper to create. This means there’s a huge opportunity for your business on YouTube.
If you’ve been debating getting started on YouTube or have maybe experimented a little and not yet found your feet, this post is for you. Throughout this post we’ll dive into:
The basics of getting your account set up
How to create a YouTube channel
How to create the perfect channel art
Top tips for optimizing your channel.
Ready to start? Let’s go.
How to create a YouTube channel
Creating a YouTube channel using your Google account
If you have a Google account, you can watch, share and comment on YouTube content. However, Google accounts don’t automatically create YouTube channels. Getting a new channel set up is a simple and quick process, though.
1. Go to YouTube and sign in
Head over to YouTube.com and click ‘sign in’ in the top right corner of the page:
Then log in using the Google Account you’d like your channel to be associated with:
2. Head over to your YouTube settings
In the top right corner of the screen, click on your profile icon and then the ‘Settings’ cog icon.
3. Create your channel
Under your settings, you’ll see the option to “Create a channel,” click on this link:
Next, you’ll have the option to create a personal channel or a create a channel using a business or other name. For this example, we’ll choose the business option:
Now, it’s time to name your channel and select a category. The channel options available include:
Product or Brand
Company Institution or Organization
Arts, Entertainment or Sports
Other
Note: a new Google+ page will also be created for your brand.
Congratulations! You’ve just created a new YouTube channel ?
Next, let’s fill out all the information and create some channel art to get your page looking awesome (click here to jump to the next section).
How to create a YouTube channel if you don’t already have a Google account
If you don’t already have a Google account set up, you’ll need to create one before you get started on YouTube. To do this, simply follow the below steps:
Now, you’re all set up with a Google account and can follow the above steps to create a YouTube channel.
How to create YouTube channel art
YouTube channel art is essentially YouTube’s version of the Facebook cover photo. Channel art features in a prominent place on your YouTube channel, which means it’s absolutely vital for any YouTube channel to use customized art to share your personality or more about your brand with your audience.
Gary is well-known for his public speaking at conferences and for sharing all he knows about marketing and building businesses with his audience. This is reflected in his cover photo, which displays Gary in mid-flow giving a presentation at what seems to be a large event. The inclusion of his handle @garyvee helps users to identify him on other social chanels and his signature branding makes the art feel personal.
Here’s what you need to know to create striking YouTube channel art…
The perfect sizes for YouTube channel art
The best place to start with your channel art is with the optimal image size that works across multiple devices. For the best results, YouTube recommends uploading a single 2560 x 1440 pixel image.
Minimum width: 2048 X 1152 px. This is the “safe area”, where text and logos are guaranteed not to be cut off when displayed on different devices.
Maximum width: 2560 X 423 px. This means that the “safe area” is always visible; the areas to each side of the channel art are visible depending on the viewer’s browser size.
File size: 4MB or smaller recommended.
YouTube also supplies a Channel Art Template in both PNG and PSD formats to help your figure out the perfect layout for your channel are and how it’ll look across platforms:
Here’s an example of how I used this template to create some channel art for the Buffer YouTube account:
And here’s how it looks across various platforms:
2 top tips for YouTube channel art
1. Ensure any text and logos are within the safe area
The text and logo safe area is the 1546 x 423 pixel space at the center of the YouTube channel art template. This is the area that will be displayed on YouTube when your channel is viewed on desktop screens.
Be careful to ensure any important information such as branding, text, taglines, and key images are within this space so that it’s always displayed as part of your channel art across every device.
2. Consider your channel links
YouTube enables you to add links to your channel and these are displayed in the bottom right corner of your channel art. For example, check the bottom right of the channel art below:
When creating your channel art, it’s important to think about the space these links take up and ensure you don’t have anything important (such as logos) occupying that space within your design.
How to add art to your YouTube channel
If you’re just setting up your YouTube channel, you’ll notice the channel art space is blank with a clear call to action to add your art:
Once you’ve clicked this link, you’ll see a popup window that gives you the option to upload your own custom channel art. If you’d like to, you can also choose to use one of YouTube’s templates from the “Gallery” or choose to upload one of your photos from Google+.
Adjusting the crop
Once you’ve uploaded your channel art, YouTube allows you to adjust the cropping of your image so that you can ensure it’s all lined up correctly.
This crop screen is very handy for checking how your design will look on various platforms. The clear section in the middle of the grid shows you the content that will be displayed on mobile and desktop and the rest of the image shows the image that will be displayed on TVs.
Once you’re happy with the way your cover art looks, click “Select” and your channel art will be added to your channel and saved.
Changing your current channel art
If you already have some channel art in place and would like to update it, head over to your channel homepage. From here, move your mouse over your cover art and you’ll notice a little edit button appear in the top right-hand corner:
Once you’ve clicked on this icon, you can update your channel art.
This video from YouTube also explains how to add and edit your channel art:
How to add your channel icon
Each channel also has space for a profile icon.Your channel icon shows over your channel art banner. It’s the icon that shows next to your videos and channel on YouTube watch pages. The key here is to select something that will look good at very small resolutions – many brands opt to use their logo here.
Your channel icon should be 800 x 800 pixels and one of the following formats: JPG, GIF, BMP or PNG file (no animated GIFs).
To update your channel icon, head to your channel homepage and hover over your current channel icon until you see the edit icon appear. Click on that icon and you’ll be able to upload a new icon:
5 ways to enhance your channel
1. Optimize your description
YouTube gives you a space on your channel to write a little about your brand and the content you share on YouTube. The description is limited to 1,000 characters, so you have a little room to be creative here.
The copy in your channel description won’t just appear on your channel page. It’s indexed by search engines and can also be featured across YouTube in suggested channel categories. A good tactic is to include some relevant keywords and CTAs within the opening lines of your description.
2. Add links to your channel
We briefly mentioned channel links earlier in this post and I’d love to share with you how to add these links in 4 super-quick steps:
1. The first step is to head to your channel homepage and click on the ‘cog’ icon next to your subscriber count:
2. Next, you’ll see a Channel Settings lightbox appear. Here you need to toggle on the option labeled “Customize the layout of your channel”:
3. Now that you’ve enabled customizations on your channel, pop back to your channel homepage and you’ll now see the option to “Edit Links” under the settings menu on your cover art:
4. Click the “Edit Links” option and you’ll then be taken to the “About” section of your channel. Here you’ll have the option to add links and choose how many are displayed over your cover art:
3. Add a channel trailer
As soon as visitors land on your channel, you want to give them a picture of the type of content your channel covers and why they’ll want to subscribe and check out your videos. A channel trailer is the perfect way to do this.
A short, to-the-point channel trailer can be a great way to introduce people to your content. A channel trailer should grab attention as soon as it starts and also represent the type of content you create on YouTube.
It’s also important to think about the description you add to this video as it features prominently on your channel homepage.
(These trailers only appear for people who are not yet subscribed to your channel.)
Here are a couple of great examples:
Gary Vaynerchuk
SoulPancake
4. Add your contact details (email address)
If you’re using YouTube as a business or a creator, it can be great to have your contact details on hand for anyone who is interested in your work. YouTube has a section on each channel profile for you to list your contact details for business inquiries.
This can be found under the “About” section of your channel. To find it, go to your channel homepage, click “About” from the navigation and then scroll down to “Details.” Here you’ll see the option to share your email address:
Over to you
Thanks for reading. It’s been great fun to dive into how to create a YouTube channel and I hope you picked up one or two tips from this post. If you create a YouTube channel of your own or already have one up and running, I’d love to hear from you and learn from your experience in the comments below.
Do you have any tips to optimize your YouTube channel? ?